Windows Ink works great on 2 in 1 devices and interactive displays, plus it is built right into Windows. Check out the different ways you can use Windows Ink below.
Windows Ink Workspace
Accessing Windows Ink Workspace
Select the windows Ink icon from the bottom right of your screen.

Sketchpad

The sketchpad in the Windows Ink Workspace is a simple blank canvas where you can quickly and easily bring up a whiteboard for use in lessons. From within Sketchpad you have access to some quick and simple tools including pens and a ruler. You can then save the whiteboard as an image to use later.
Sketchpad tools


The first 3 icons on the menu are the pen tools. You have a pen, pencil and highlighter. You can adjust their color and line thickness by selecting the icon a second time to show the menu.

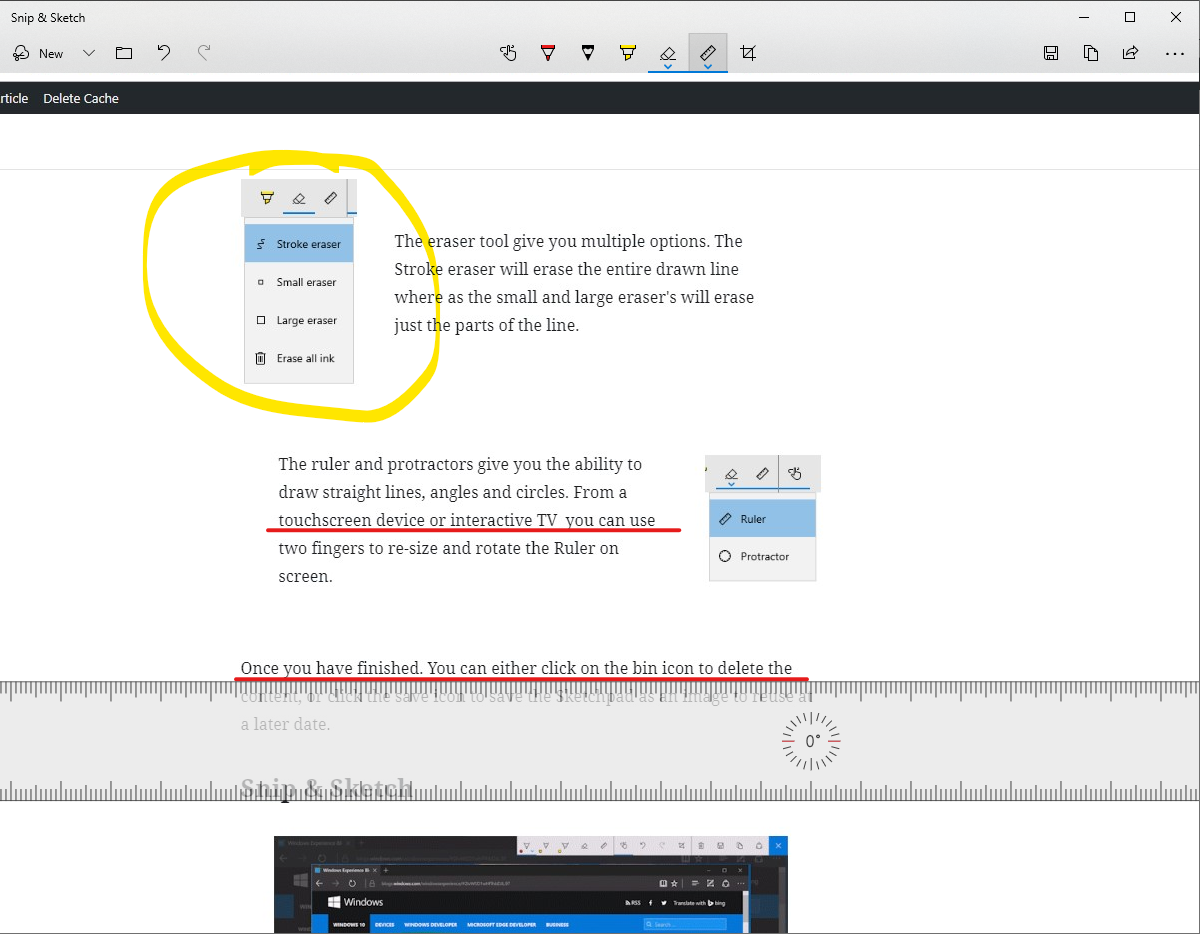
The eraser tool gives you multiple options. The Stroke eraser will erase the entire drawn line where as the small and large erasers will erase just the parts of the line.

The ruler and protractors give you the ability to draw straight lines, angles and circles. From a touchscreen device or interactive TV you can use two fingers to re-size and rotate the Ruler on screen.
Once you have finished. You can either click on the bin icon to delete the content, or click the save icon to save the Sketchpad as an image to reuse at a later date.
Snip & Sketch

Snip & Sketch allows you to take screen shot of your entire screen or just a section of the screen. You can then annotate over the image and save it. This can be really useful in the classroom where you want to quickly draw over a web page or document.
Using Snip & Sketch
To access Snip & Sketch, click on the Windows Ink Workspace icon at the bottom right of the screen and select Snip & Sketch.
To take a new Snip of your screen, Select New

Once you have selected new, you will see a tool bar at the top of your screen. you can choose from the following sniping tool options.

- Rectangle snip of a section of the screen.
- Free form snip of your screen
- The entire screen
Once you have sniped your screen you can then sketch over the image, using the pen tools at the top of the screen.
Click the save icon to save the image or the copy icon to copy the image into another programme.